Getting started with Poststation on the RP2350
2/14/2025, 10:00:00 PM
Ever wish getting or sending data to an embedded device was as easy as sending a web request? Well now you can with Poststation! Just like a post office handles communications, Poststation handles the communication between a host device running a full OS and an embedded device running Rust. Poststation lets you focus on building the project you have in mind instead of building the tools to build the project.
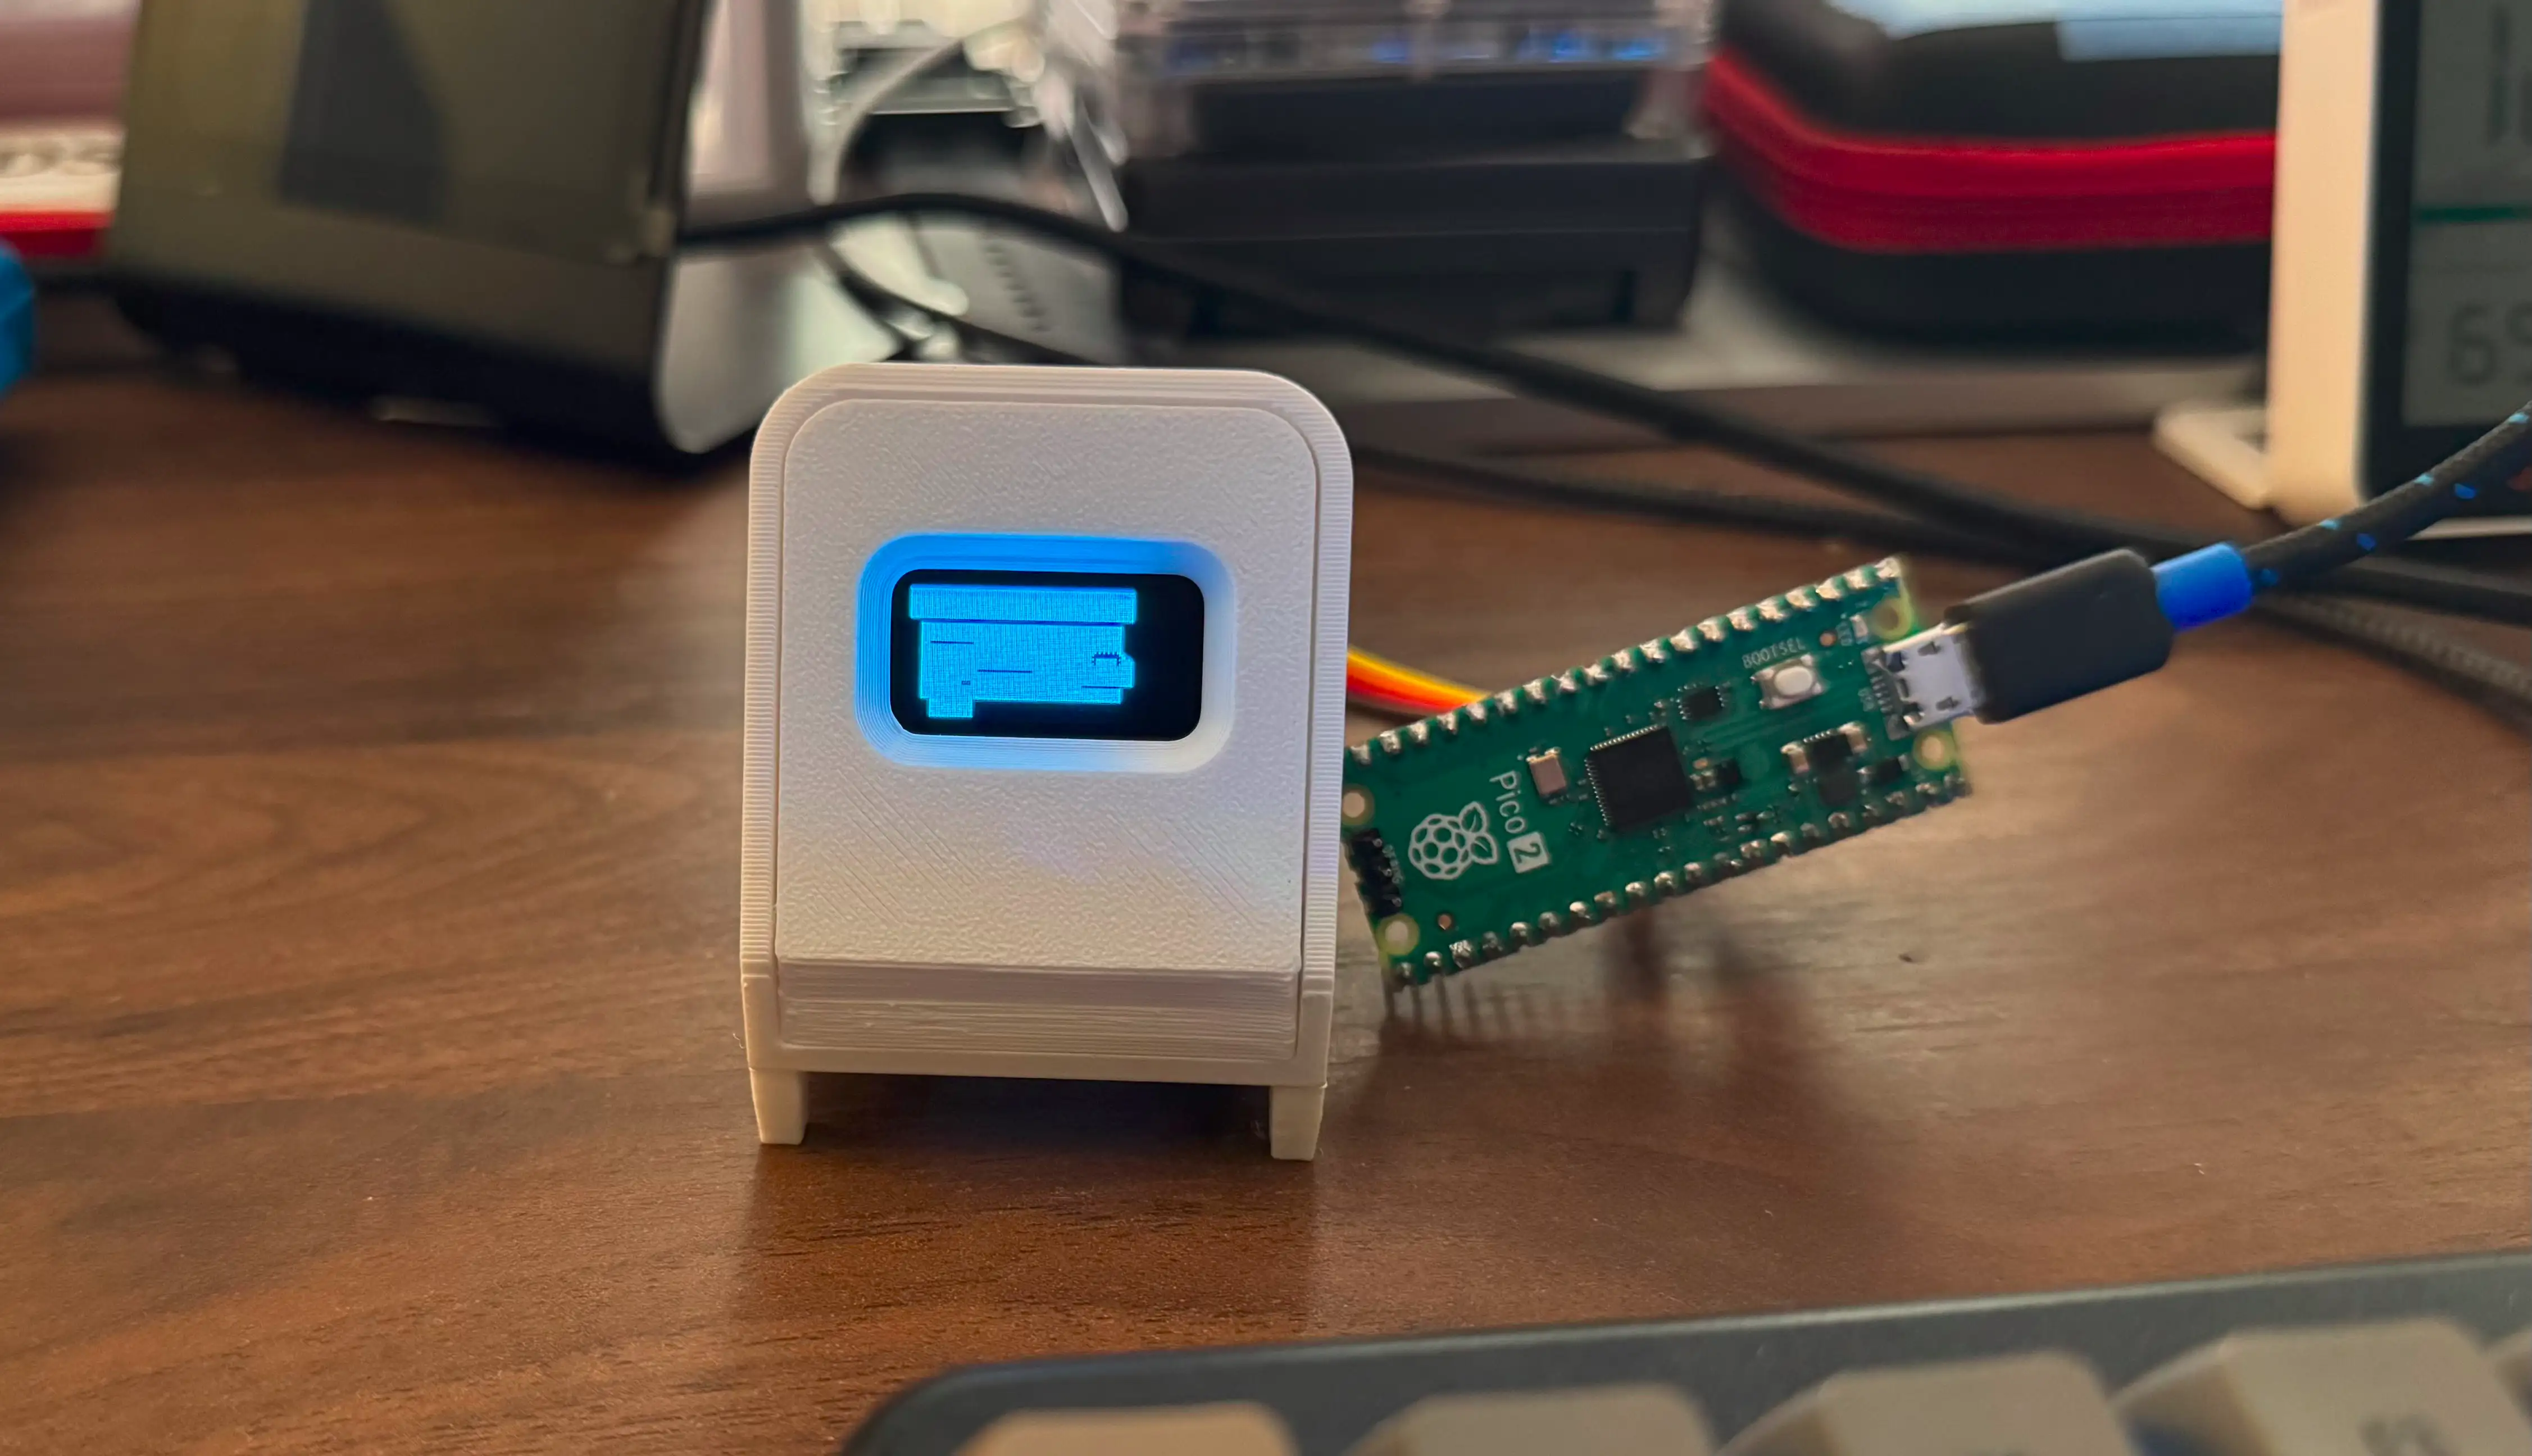
In this blog post we are going to explore Poststation by building a Rust program that runs on your computer that uses Poststation to send your computer usage to a Pico 2 displaying the usage on a SSD1306 OLED screen.

Table of Contents
- postcard, postcard-rpc, and Poststation
- Requirements
- Setup
- Project Breakdown
- Who said you could only use Rust?
postcard, postcard-rpc, and Poststation
Before we get started I wanted to break down some of the different components that make up the postcard ecosystem. You can also check out this excellent explanation that goes into more detail. In my day job, I'm a web developer, so I'll try to use web development terminology to draw parallels between the different postcard projects and what it would be like in the web world.
postcard
From the projects README
postcard is a #![no_std] focused serializer and deserializer for Serde.
postcard is the underlying data structure. Think of it kind of like JSON or XML, but optimized to be easy to serialize and deserialize on embedded devices where resources can be limited. If you're curious about more of how it works then I recommend checking out The postcard Wire Specification. But for this blog post to keep it simple just know that this is the specification of how the data that is sent between the microcontroller and our Host application.
postcard-rpc
From the projects README
A host (PC) and client (MCU) library for handling RPC-style request-response types.
To keep to a web analogy where postcard is JSON or XML, postcard-rpc is the web server, as well as the web framework. postcard-rpc gives you everything you need to set up communications between the Host and the microcontroller. Like handling the transporting of the data via USB, TCP, I2C, UART, etc. As well as giving you the framework to build handlers on both the microcontroller and the host to receive and send requests that are serialized with postcard. The graphic on postcard-rpc's doc.rs page does a great job of showing how it all works together.
Poststation
Poststation takes care of the host side of postcard-rpc and just lets you focus on just writing the logic you need for your project. No need to worry about how to send data back and forth, how to handle multiple devices, connects/disconnect, It all Just Works™.
Poststation is a TUI program and REST api that runs right in your terminal and allows you to interact with your microcontrollers.

Some of the features are:
- UI Display of your connected devices with info and their status
- A section to see the logs from your device
- Endpoints section to see the postcard-rpc endpoints (Works similar to url routes). Can view the request and response types here as well
- Topics are similar to Endpoints but do not expect a response, can also see the request types here
- History and tracing to help troubleshoot
- Exposes a postcard-rpc TCP service endpoint that allows you to also query all of this by using the poststation-cli or with poststation-sdk for your Rust projects. I will talk a bit more about this in postcard-rpc TCP endpoint
- A JSON REST api that gives you all the same access as the sdk from a web call.
There's a lot more to Poststation, but that's the general introduction for what we need to know for the purpose of this post. To learn more check out these links:
- poststation-util repo - Source code of the cli tool, templates to get started, and examples
- poststation-book - Will go into much more details about Poststation as well as detailed getting started guides
- The Embedded Buddy System by SDR Podcast
Unlike the other projects Poststation is a paid for closed source project, BUT you can download it today and use it in
a limited trial and be able to follow along with this post. I can't recommend buying it enough. A one time payment and is valid for all v0.x and v1.x versions. No yearly subscription, buy it once and it's yours. You can buy it here
Requirements
Software
- Rust
- Picotool - to flash the firmware (Make sure the Pico tool binary is in your path)
- If you have any issues can also use elf2uf2-rs
- Poststation - For more details on how to install, you can follow the instructions on this page
- poststation-cli - We use this in a script for resetting to the bootloader to flash firmware changes. For more details on how to install, you can follow the instructions on this page
- Projects Repo - This is the finished repo for the project
Hardware
Poststation works with a lot of Microcontrollers, but for this post we are using the RP2350.
- A Pico 2, or any other RP2350 device
- This can also work with the Pico/RP2040 with a few changes, I may release another branch with this (especially if someone lets me know they would like that example)
- A SSD1306 OLED display. These are the cheap little I2c displays you can find on various online retailers. In this project we are using the 128x64 variant
- Optional, but I found this cute little 3D printed case that looks like a TV.
Setup
The wiring is pretty simple just 4 wires to connect. We power both the pico and screen from USB since we're using it to communicate to the Host program
| Wireing | Pico | Screen |
|---|---|---|
| 3v3 | 3v3 out, Pin 36 | VDD |
| GND | Any GND, I used Pin 38 | GND |
| SCL | GPIO 27 | SCL |
| SDA | GPIO 26 | SDA |
The ease of communicating between device and Host that Poststation gives us allows us to work on the project without the need for a Debug Probe, and we can still get logging, firmware flashing without manually resetting to BOOTSEL.
To flash for the first time:
- Hold down the BOOTSEL button as you connect the pico to your computer releasing once connected (usually wait for a second or two after connecting)
- Inside the
firmwarefolder runcargo run. - After this should be able to open Poststation from your terminal and see the device connected!
- To update the firmware you now change the
SERIALvariable found in ./firmware/scripts/picoboot.sh - Then run the script. This sends a message via Poststation to the Pico to reboot to bootsel, then starts the building/flashing process
- You should now see a screen displaying the Poststation logo waiting on a connection from the host
To run the Host program
- Make sure Poststation is running, or you can make a copy of
.env.example, rename to.envand set thePOSTSTATION_LOCATIONvariable to your Poststation binary location. Mileage may vary on this feature, make sure to check the logs if you have issues - Then just run
cargo runin side of thehostfolder
That should be it! You should now see your computer usage on the device
Project Breakdown
A quick order of operations to show how everything Interacts
- The pico boots to the firmware
- Once booted it connects to Poststation that is running on your computer via USB. This is then how the Pico talks communicates with the Host device (Your computer).
- When you start the Host program it uses the poststation-sdk crate to get a list of connected devices via a JSON web request and selects the first connected device
- Once selected it makes another JSON web request to Poststation with the computer usage from the sys-info crate
- Poststation then does it's magic and routes that to the device via it's serial number
- On the Pico a postcard-rpc handler runs and displays the usage on the display
The only code you have to write was 2,3,and 5. Just the bare minimum to pick a device and then the logic for getting the usage from the computer, then displaying it on the Pico. That's the power of Poststation, it lets you focus just on the code you need to write for your project, Don't worry about any of the communications between the devices . It Just Works™.
To start a new project you can also copy the template and start from there. That is found here
To go a bit deeper I am going to break down each of the crates in this project and their role
icd Crate
The icd crate is shared between the firmware and host crate. This is one of the points where the postcard ecosystem shines in my opinion. Because of this crate you can share models and endpoints between the two, you have the same types in all your projects!
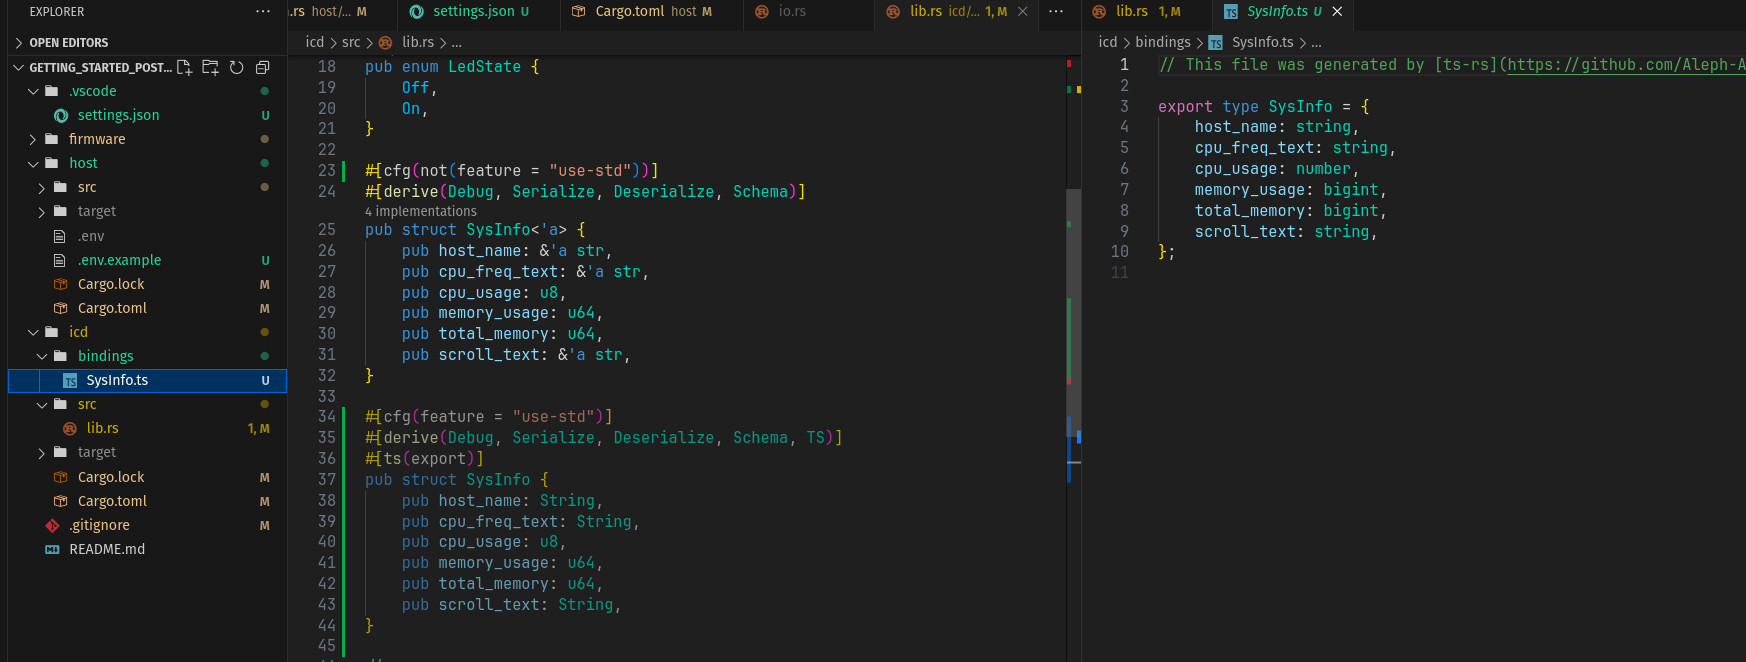
For example the struct we use to send the usage is this
#[derive(Debug, Serialize, Deserialize, Schema)]
pub struct SysInfo<'a> {
    pub host_name: &'a str,
    pub cpu_freq_text: &'a str,
    pub cpu_usage: u8,
    pub memory_usage: u64,
    pub total_memory: u64,
    pub scroll_text: &'a str,
}
Since this is in the icd crate it's the same data type you send from the Host as you receive on the firmware
This also holds the definitions for postcard-rpc's endpoints and topics that are defined in macros and styled with a Markdown table like syntax. If you wanted to see what it was like to add a new one can check this commit
// Endpoints spoken by our device
//
// GetUniqueIdEndpoint is mandatory, the others are examples
endpoints! {
    list = ENDPOINT_LIST;
    | EndpointTy                | RequestTy     | ResponseTy            | Path                          |
    | ----------                | ---------     | ----------            | ----                          |
    | GetUniqueIdEndpoint       | ()            | u64                   | "poststation/unique_id/get"   |
    | RebootToPicoBoot          | ()            | ()                    | "template/picoboot/reset"     |
    | SleepEndpoint             | SleepMillis   | SleptMillis           | "template/sleep"              |
    | SetLedEndpoint            | LedState      | ()                    | "template/led/set"            |
    | GetLedEndpoint            | ()            | LedState              | "template/led/get"            |
    | SetDisplayEndpoint        | SysInfo<'a>   | ()                    | "template/display/set"        |
}

// incoming topics handled by our device
topics! {
    list = TOPICS_IN_LIST;
    direction = TopicDirection::ToServer;
    | TopicTy                   | MessageTy     | Path              |
    | -------                   | ---------     | ----              |
}

// outgoing topics handled by our device
topics! {
    list = TOPICS_OUT_LIST;
    direction = TopicDirection::ToClient;
    | TopicTy                   | MessageTy     | Path              | Cfg                           |
    | -------                   | ---------     | ----              | ---                           |
}
Firmware Crate
The firmware crate is written using embassy-rs.
app.rs
app.rs defines our local firmware application
Context is what holds shared state and our peripherals. This is passed to handlers and how they can access things like turning on the LED or writing text to the screen.
/// Context contains the data that we will pass (as a mutable reference)
/// to each endpoint or topic handler
pub struct Context {
    /// We'll use this unique ID to identify ourselves to the poststation
    /// server. This should be unique per device.
    pub unique_id: u64,
    pub led: Output<'static>,
    pub display: Ssd1306Async<
        I2CInterface<I2cDevice<'static, NoopRawMutex, I2c<'static, I2C1, i2c::Async>>>,
        DisplaySize128x64,
        ssd1306::mode::BufferedGraphicsModeAsync<DisplaySize128x64>,
    >,
}
The rest is set up for postcard-rpc. All of this is usually the same as the template except we do defined what handler is called when an endpoint is called.
Think of this as a web router defining which web controller(handler) to call. Since we are using embassy and the async version of the ssd1306 crate we use the aync kind for SetDisplayEndPoint
endpoints: {
    // This list comes from our ICD crate. All of the endpoint handlers we
    // define below MUST be contained in this list.
    list: ENDPOINT_LIST;

    | EndpointTy                | kind      | handler                       |
    | ----------                | ----      | -------                       |
    | GetUniqueIdEndpoint       | blocking  | unique_id                     |
    | RebootToPicoBoot          | blocking  | picoboot_reset                |
    | SleepEndpoint             | spawn     | sleep_handler                 |
    | SetLedEndpoint            | blocking  | set_led                       |
    | GetLedEndpoint            | blocking  | get_led                       |
    | SetDisplayEndpoint        | async     | set_screen_text               |
};
handlers.rs
handlers.rs is where we write our actual logic that we want to run when sending or receiving events via Poststation In a web world, this would be our web controller that handles GETs, POSTS, etc requests.
Notice how some like the picoboot_reset handler (that we use to reboot to BOOTSEL) are blocking and do not have a return type or take a request.
/// Also a BLOCKING handler
pub fn picoboot_reset(_context: &mut Context, _header: VarHeader, _arg: ()) {
    embassy_rp::rom_data::reboot(0x0002, 500, 0x0000, 0x0000);
    loop {
        // Wait for reset...
        compiler_fence(Ordering::SeqCst);
    }
}
Where others like the set_led can take a request LedState
/// Also a BLOCKING handler
pub fn set_led(context: &mut Context, _header: VarHeader, arg: LedState) {
    match arg {
        LedState::Off => context.led.set_low(),
        LedState::On => context.led.set_high(),
    }
}
or like get_led can return a request back to the host
pub fn get_led(context: &mut Context, _header: VarHeader, _arg: ()) -> LedState {
    match context.led.is_set_low() {
        true => LedState::Off,
        false => LedState::On,
    }
}
You can also pull peripherals from the context like in the set_screen_text handler. Notice how the request it receives is the SysInfo struct we defined in the icd crate.
pub async fn set_screen_text<'a>(context: &mut Context, _header: VarHeader, arg: SysInfo<'a>) {
    context.display.clear_buffer();

    let buffer = &mut [0u8; 1024];
    let mut cursor = Cursor::new(buffer);

    let _ = write!(
        &mut cursor,
        "{}\nCPU:{} {}% \nRam:{}/{}\n\n{}",
        arg.host_name,
        arg.cpu_freq_text,
        arg.cpu_usage,
        arg.memory_usage,
        arg.total_memory,
        arg.scroll_text
    );
    Text::with_baseline(cursor.as_str(), Point::zero(), TEXT_STYLE, Baseline::Top)
        .draw(&mut context.display)
        .unwrap();
    let _ = context.display.flush().await;
}
main.rs
main.rs is pretty much the same as the template, when starting a new project you can mostly leave this the same. But do need to define and pass in what you need to the context
//Setup the I2c bus to connect to the SSD1306 display
let i2c = I2c::new_async(p.I2C1, p.PIN_27, p.PIN_26, Irqs, i2c::Config::default());
static I2C_BUS: StaticCell<I2c1Bus> = StaticCell::new();
let i2c_bus = I2C_BUS.init(Mutex::new(i2c));

// Set up for the SSD1206 display
let i2c_dev = I2cDevice::new(i2c_bus);
let interface = I2CDisplayInterface::new(i2c_dev);
let mut display = Ssd1306Async::new(interface, DisplaySize128x64, DisplayRotation::Rotate0)
    .into_buffered_graphics_mode();
let display_init_result = display.init().await;

...


let context = app::Context {
    unique_id,
    led,
    display,
};
The shared_bus.rs example in the embassy-rs repo is a great resource to see an examples how to share these resources with the Context so our handlers have access to them.
Host Crate
The host program is a simple Tokio program that runs in the terminal and gets the computer resource usage via the sysinfo crate.
The order of operations then is:
- When started we connect to the postcard-rpc endpoint that is running at
localhost:51837using the poststation-sdk. It's important to note that this is not the endpoint for the REST API. This is a port running a postcard-rpc service hosted by Poststation that uses postcard-rpc wire protocol and postcard to communicate back and forth. - We then make a call with the sdk to get a list of devices, then since we know we only have one connected it grabs the first connected device. Then it's sent to Poststation using the SDK.
- Poststation sends the request by USB to the Pico where the
set_screen_texthandler is called - We set the
SetDisplayEndpointEndpoint to use theset_screen_texthandler inapp.rs - We know the Endpoint because we set it in the icd crate along with the Request type of
SysInfo<'a>
let client = match connect("localhost:51837").await {
    Ok(c) => c,
    Err(e) => {
        error!("{:?}", e);
        return Err(
            "Error connecting to oststation, please make sure it is running".to_string(),
        );
    }
};

let connected_devices = match client.get_devices().await {
    Ok(connected_devices) => connected_devices,
    Err(e) => {
        error!("{:?}", e);
        return Err("Error getting connected devices.".to_string());
    }
};

let first_connected_device = connected_devices
    .iter()
    .filter(|d| d.is_connected == true)
    .next()
    .unwrap_or_else(|| {
        error!("No connected devices found. Poststation is running, please make sure you have an active device connected");
        std::process::exit(1);
    });

info!("First connected device: {:?}", first_connected_device);

let mut sys = System::new_all();
let host_name = System::host_name().unwrap_or("".to_string());

let mut message_seq_number = 0;
let mut interval = interval(Duration::from_millis(500));

loop {


    //Can check the repo for how the sys info is gathered
    //https://github.com/fatfingers23/pico-pc-performance-monitor/blob/main/host/src/main.rs
    let sys_info = SysInfo {
        host_name: host_name.as_str(),
        cpu_freq_text: cpu_avg_freq_str.as_str(),
        cpu_usage: formatted_to_u8,
        memory_usage: memory_usage_mb,
        total_memory: total_memory_mb,
        scroll_text: scroll_text.as_str(),
    };

    debug!("SysInfo: {:?}", sys_info);

    let result = client
        .proxy_endpoint::<SetDisplayEndpoint>(
            first_connected_device.serial,
            message_seq_number as u32,
            &sys_info,
        )
        .await;
    message_seq_number += 1;

    if let Err(e) = result {
        error!("{:?}", e);
    }
    interval.tick().await;
}
Who said you could only use Rust?
postcard-rpc TCP endpoint
I have talked a bit about the postcard-rpc service endpoint running at localhost:51837. I wanted to go into more detail. This is an endpoint that Poststation provides for us.
That endpoint is part of Poststation and because of that it is closed source. But postcard-rpc is open source and so is the SDK so we can look at how those work to get an idea of how it may work.
When we use poststation-sdk it is actually creating a TCP connection to Poststation and using the postcard-rpc wire protocol to send back and forth via messages serialized with postcard. This is done on the server by implementing a postcard-rpc server presumably.
Since the sdk is open source you can see here that a HostClient with a TCP socket to handle the communications between Poststation and your project.
This is one of the perks of Poststation, we don't have to worry about any of this. It's taken care of for us and we have easy to use APIs to communicate to and from our microcontrollers in a well optimized way with the postcard ecosystem.
JSON Rest API
By default, the JSON Rest api is turned off. But you can turn it on by making a change to the Poststation config file found via the poststation-cli folder command.
To allow the api running on port 4444 you just need to uncomment [apis.http] and restart Poststation.
Your config should look something like this
....

# # `apis.http`
#
# This section is used for the REST API. This section is optional,
# and when omitted the REST API is disabled.
#
# When `insecure` security is selected, only `local-only` mode
# is allowed.
[apis.http]
# ## REST API Security options - pick ONE:

# Insecure, no encryption, only local connections will be allowed
# security = "insecure"

# Self-signed CA certificate. Global connections will be allowed, clients
#   on other machines will need a copy of the generated CA Certificate
#
# This is the default and recommended option.
# security = "tls-self-signed"

# ## Listener options
# listener.local-only = { port = 4444 } # default
# listener.global     = { socket_addr = "0.0.0.0:1235" }

....
Poststation by default serves this API with a self-signed SSL cert so if you want to use the cert in your curl command would look something like below.
You can get your --cacert location from the poststation-cli folder command.
curl --cacert "/home/baileytownsend/.local/share/poststation/ca-cert.pem" "https://127.0.0.1:4444/api/devices" -q -H "Accept: application/json"
[
  {
    "serial": "000000000000007B",
    "name": "HARIET-331",
    "is_connected": false,
    "manufacturer": "Sunny Brooke Development",
    "product": "rusty-presto-2350"
  },
or you can just ignore the self-signed cert completely with the -k option.
curl "https://127.0.0.1:4444/api/devices" -k -q -H "Accept: application/json" | jq
You also have the option to turn off SSL completely with setting the security = "insecure" in the Poststation config.
[apis.http]
# ## REST API Security options - pick ONE:

# Insecure, no encryption, only local connections will be allowed
security = "insecure"
With the REST API on Poststation you are able to use what ever programming language you'd like. Sending a message to and from your Microcontroller is now one web request away!
If you are curious what the rest of the endpoints are, you can view them in the poststation-util repo
Types all the way down
Since I am a web developer as I have been using Poststation I keep thinking about ideas where I could make a web dashboard with stats from a Pico. During that time I started thinking too about how nice it would be to have the same types all the way through.
That's when I found ts-rs which allows you to export your Rust structs to TypeScript types.
I have plans to write a library in TypeScript along with an example project that will allow you to call the Poststation API securely with strong types. So then you will be able to have the same exact data types on your Hardware when you write Rust there, as you will have on the Website that calls the Microcontroller! I want to make it as simple as possible for newcomers to the embedded world to be able to use the tools they are used to and make amazing projects with them!
Closing Remarks and Special Thanks
I've just scratched the surface of Poststation in this blog post. I did not cover how it lets your Host do complicated things that are usually hard on Microcontrollers like web calls, or like generating images to be displayed on an e-ink screen. Didn't even talk about how you can use a Host as a way to pass messages onto other Microcontrollers or just have many connected to it as once. But I will save that for another day or for you to find out on your own!
That's pretty much it! So far I have loved Poststation, between the ease of communications between devices, the excellent templates for writing your project. I think this is well worth buying and using, even if this is just a hobby for you. It's been well worth it for me to just be able to focus on writing the project I want to write.
Thank you for making it this far and I hope you have learned something new! Also, special thanks to James Munns the creator of the postcard ecosystem and Poststation for an early trial license key and being such a big help with any questions I had. I know this may sound like a paid for review, but it's not. I have enjoyed working with Poststation and wanted to share that with everyone. I can't recommend it enough, I even bought a license, so I can continue using it once the trial is up. Thanks again for reading!
Don't forget you can just download and try it out today without even buying a license.